In this post, we will learn how to create a heatmap to analyze annotations in a video sequence.
We first elaborate on why this would be useful, give a real world application, and follow up with a tutorial and implementation in Python.
Why use Heatmaps for Logo Detection Analysis?
In computer vision, we often need to annotate the location of objects in a video using bounding boxes, polygons, or masks. Sometimes these annotations are produced by human annotators for creating training data and sometimes the annotations are automatically generated as a result of object detection and tracking.
Analyzing annotations frame by frame is not always a good idea because sometimes a video sequence can be several minutes or hours long. At other times, the videos are short, but there are thousands of them ( e.g. in a training set ). This is where Heatmaps can be very useful.
Heatmaps provide for a quick visual way to analyze the screen location of object exposure across an entire video. The parts of a frame where an object appears more frequently (i.e. high exposure areas) are colored red (hot) and conversely, the parts of the video where an object appears infrequently are colored blue (cool).
Heatmaps for Exposure of Logos
At my company, Orpix, we use deep learning methods to detect brands and logos in digital media for sponsorship valuation. A sample of our logo detection is shown below.
Brands that sponsor events place their logos on digital boards and on clothing. Market researchers assess the quality of exposure a brand gets based on a variety of factors —
- Exposure Time: The more time a logo is exposed on screen, the more successful an ad is deemed.
- Location: There are a few dimensions to location of a logo. First, if the logo is in the center of a frame, it is more likely to grab attention. Furthermore, if a logo is on the clothing of a prominent athlete, the exposure increases in value.
- Size & Clarity : When it comes to advertisement, size does matter! Needless to say an ad that covers a large screen space is much more valuable than the one that does not. Similarly, a blurry ad is less valuable than one that is clearly seen.
- Spotlight : Advertisers like to see their logo without other logos sharing the limelight. They often buy the entire visible ad space as shown in the sample output above.
Computing a heatmap for a brand’s exposure in a video can help in part to quickly value sponsorship across the entire video.
Logo Analysis for the 2018 Fifa World Cup Finals
The 2018 Fifa World Cup entertained millions of people around the world for weeks. In many countries, work stopped when an important match was on.
While most people were glued to the TV debating the odds of their favorite team, many teams of data scientists were working behind the scenes analyzing the effectiveness of sponsorship campaigns shown during the match.
At Orpix, we ran a recording of the live stream aired in the United States through our logo detection pipeline. The Fifa World Cup final lasted for 2 hours, 26 minutes and 13 seconds. We sampled the match time at 1 frame per second for analysis which produced a total of 8773 frames.
Nike Logo Detection Analysis
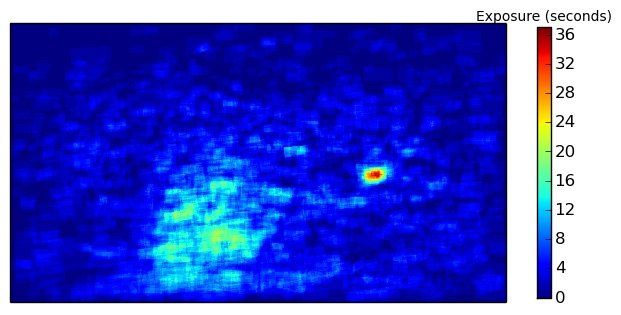
No points for guessing which company logo topped the list. It was obviously Nike — the biggest sporting goods company in the world. Their logo appeared on the players’ clothing on 1221 frames — an astounding 14% of the total broadcast time. The Nike exposure heatmap is shown below.
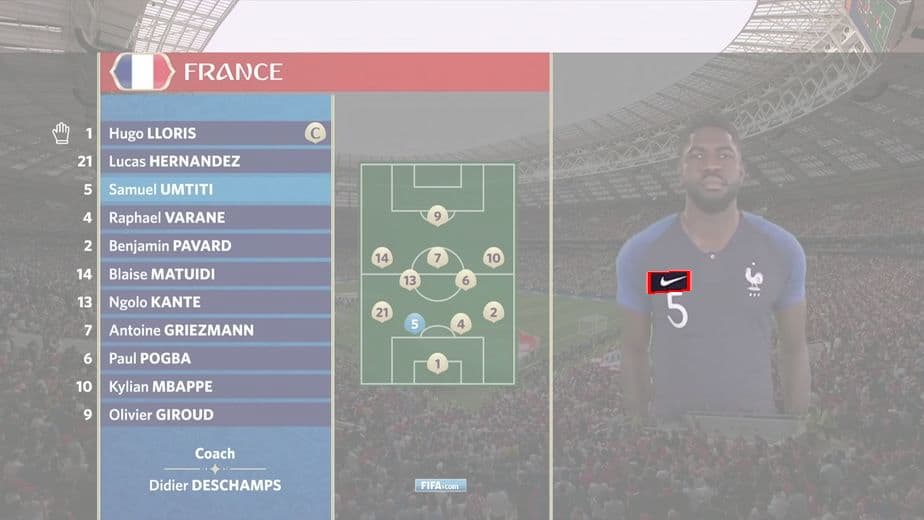
While Nike did receive the largest share of exposure throughout the game, the heatmap demonstrates that the distribution of exposure was spread out fairly evenly across the screen. This can also be easily inferred from looking at the highest exposure of 36 seconds and comparing it to the total exposure time of 1221 seconds for the entire game. The heatmap is interesting because you cannot help but be curious about the hot spot in middle-right of the screen. Turns out Nike got a lot of exposure when players were introduced as shown in the image below.
VISA Logo Detection Analysis
If you cannot get your logo on players’ clothing, your next best option is to advertise on digital boards. Credit card processing company VISA topped the list of logos detected on digital boards (769 seconds), closely followed by sporting giant Adidas.
In the example below, the Visa logo appears for a total of 769 seconds. The heatmap shows that in 80 (indicated by red) of those seconds, the Visa logo appeared in the upper left part of the screen. When contrasted with the Nike heatmap, you can see that the exposure Visa obtained was concentrated much more heavily in a specific location throughout the game (as denoted by the ratio of highest exposure on the heatmap of 80 to total exposure of 769). This is because when a logo appears on a digital board, it is not moving nearly as much as a logo on a soccer player’s jersey.
For a full sample report of the World Cup Final that Orpix generates automatically, click here.
Logo Exposure Heatmap Code Tutorial
In this section, we will show a simple way to create a heatmap for Visa logos during the 2018 World Cup Final using annotations automatically generated with Orpix Sponsorship Valuation solution, as shown in the image above.
To get started, you will need to have the following python packages installed
- opencv-python
- matplotlib
- numpy
Code Overview
We provide you with:
- generate_heatmap.py – a script to generate the heatmap
- Annotations for Visa during the 2018 World Cup Final. You can download the data here.
Unzip the data into the same directory as the script location.
Below are details on the script’s input and output.
Input:
labels.txt – the provided file contains references to images and associated annotations. The file is of the format of one image per line as follows:
image_path number_of_annotations x1 y1 x2 y2 x3 y3 x4 y4 …. (repeat the coordinates for number_of_annotations on this line)
In our case, the labels.txt references frames in the visa_frames directory along annotations of Visa for each frame. These are all of the frames where Visa occurred during the 2018 World Cup Final, sampled at one frame per second.
Note: The reason we specify 4 (x,y) coordinates instead of x,y,width,height is for added flexibility, as we output quadrilaterals in our logo detection solution.
Output:
highlighted frames – For each frame specified in labels.txt, we highlight the associated annotations on the image and save the drawn image to “output” directory. This is not required to compute the heatmap, but is done to aid the user in understanding, and also good for debugging.
heatmap – At the end of the script a heatmap is saved to the working directory as “heatmap.png”. We use matplotlib since it’s quite easy to create a nice heatmap with good colors, and a legend as well.
Simply run the script as:
>> python generate_heatmap.py
Implementation Details
First we need to initialize the data we will use to create the heatmap. We will use a single channel floating point numpy array the same size of the video frames we are processing to accumulate exposure time per pixel.
#keeps track of exposure time per pixel.  Accumulates for each image
#gets initialized when we process the first image
accumulated_exposures = None

#frames were sampled at one second per frame.  If you sampled frames from a
#video at a different rate, change this value.
#
#if you sampled frames at 10 frames per second, this value would be 0.1
#
seconds_per_frame = 1.0
Next, for each line in the labels.txt, we produce a mask where the annotation area has value of seconds_per_frame, and 0 everywhere else,
and we add that to accumulated_exposures array which we will use to create the heatmap.
#parse the line using helper function
frame_path, labels = parse_line(line)

print "processing %s" % frame_path

#load the image
frame = cv2.imread(frame_path)

#this is where the highlighted images will go
if not os.path.exists('output'):
    os.mkdir('output')

#if the heatmap is None we create it with same size as frame, single channel
if type(accumulated_exposures) == type(None):
    accumulated_exposures = np.zeros((frame.shape[0], frame.shape[1]), dtype=np.float)

#we create a mask where all pixels inside each label are set to number
#of seconds per frame that the video was sampled at.
#So as we accumulate the exposure heatmap counts, each pixel contained
#inside a label contributes the seconds_per_frame to the overall
#accumulated exposure values
maskimg = np.zeros(accumulated_exposures.shape, dtype=np.float)
for label in labels:
    cv2.fillConvexPoly(maskimg, label, (seconds_per_frame))

#highlight the labels on the image and save.
#comment out the 2 lines below if you only want to compute the heatmap
highlighted_image = highlight_labels(frame, labels, maskimg)
cv2.imwrite('output/%s' % os.path.basename(frame_path), highlighted_image)

#accumulate the heatmap object exposure time
accumulated_exposures = accumulated_exposures + maskimg
Lastly, when we finished accumulating exposures for all frames, we can produce the heatmap using matplotlib.
#
#create final heatmap using matplotlib
#
data = np.array(accumulated_exposures)
#create the figure
fig, axis = plt.subplots()
#set the colormap - there are many options for colormaps - see documentation
#we will use cm.jet
hm = axis.pcolor(data, cmap=plt.cm.jet)
#set axis ranges
axis.set(xlim=[0, data.shape[1]], ylim=[0, data.shape[0]], aspect=1)
#need to invert coordinate for images
axis.invert_yaxis()
#remove the ticks
axis.set_xticks([])
axis.set_yticks([])

#fit the colorbar to the height
shrink_scale = 1.0
aspect = data.shape[0]/float(data.shape[1])
if aspect < 1.0:
    shrink_scale = aspect
clb = plt.colorbar(hm, shrink=shrink_scale)
#set title
clb.ax.set_title('Exposure (seconds)', fontsize = 10)
#saves image to same directory that the script is located in (our working directory)
plt.savefig('heatmap.png', bbox_inches='tight')
#close objects
plt.close('all')
And that’s it! You now have an exposure heatmap that you can use to analyze for object location in video!


