


1. Image Classification vs. Object Detection
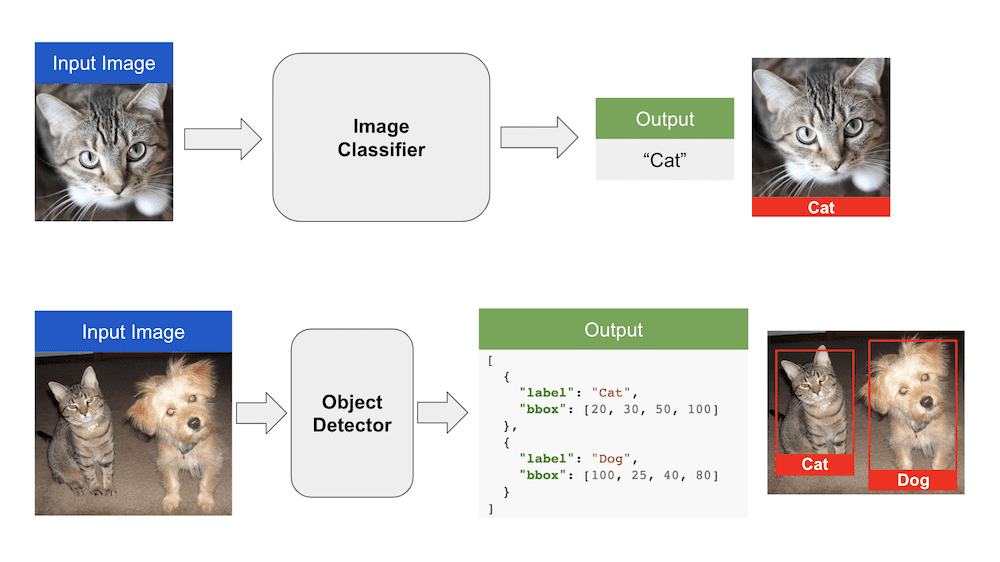
Image Classification is a problem where we assign a class label to an input image. For example, given an input image of a cat, the output of an image classification algorithm is the label “Cat”.
In object detection, we are not only interested in objects present in the input image. We are also interested in where they are located within the input image. In that sense, object detection is above and beyond image classification.
The figure above illustrates the difference between image classification and object detection.
1.1. Image Classification vs Object Detection : Which one to use?
Image classification is a good fit in applications where there is only one object in the image. There could be multiple classes (e.g. cats, dogs, etc.) but usually, there is only one instance of that class in the image.
In most applications with multiple objects in the input image, we need to find the location of the objects, and then classify them. We use an object detection algorithm in such cases.
Object detection can be hundreds of times slower than image classification. Therefore, in applications where the location of the object in the image is not important, we use image classification.
2. Object Detection
In simple terms, object detection is a two-step process
- Find bounding boxes containing objects such that each bounding box has only one object.
- Classify the image inside each bounding box and assign it a label.
In the next few sections, we will cover steps that led to the development of Faster R-CNN object detection architecture.

2.1 Sliding Window Approach
Most classical computer vision techniques for object detection like HAAR cascades and HOG + SVM use a sliding window approach for detecting objects.
In this approach, a sliding window is moved over the image. All the pixels inside that sliding window are cropped out and sent to an image classifier.
If the image classifier identifies a known object, the bounding box and the class label are stored. Otherwise, the next window is evaluated.
The sliding window approach is computationally very expensive. To detect objects in an input image, sliding windows at different scales and aspect ratios need to be evaluated at every pixel in the image.
Due to the computationl costs, sliding windows are used only when we are detecting a single object class with a fixed aspect ratio. For example, the HOG + SVM or HAAR based face detector in OpenCV uses a sliding window approach. Interesting to note, the famous Viola Jones face detection uses sliding windows. In case of a face detector, the complexity is manageable because only square bounding boxes are evaluated at different scales.
2.2. R-CNN Object Detector
Convolutional Neural Network (CNN) based image classifiers became popular after a CNN based method won the ImageNet Large Scale Visual Recognition Challenge (ILSVRC) in 2012.
Because every object detector has an image classifier at its heart, the invention of a CNN based object detector became inevitable.
There were two challenges to be overcome:
- CNN based image classifiers were computationally very expensive compared to the traditional techniques such as HOG + SVM or HAAR cascades.
- The computer vision community was growing more ambitious. People wanted to build a multi-class object detector that could handle different aspect ratios in addition to being able to handle different scales.
Therefore, a sliding window based approach for object detection was ruled out. It was just too expensive.
Researchers started working on a new idea of training a machine learning model that could propose locations of bounding boxes that contained objects. These bounding boxes were called Region Proposals or Object Proposals.
Region proposals were merely lists of bounding boxes with a small probability of containing an object. It did not know or care which object was in the bounding box.
A region proposal algorithm outputs a list of a few hundred bounding boxes at different locations, scales, and aspect ratios. Most of these bounding boxes do NOT contain any object.
Why are region proposals still useful? We just learnt that they do not work accurately!
Evaluating the image classifier at a few hundred bounding boxes proposed by the region proposal algorithm is much cheaper than evaluating it at hundreds of thousands or even millions of bounding boxes in case of the sliding window approach. Hence, the region proposal algorithm is still useful and handy at times.
One of the first approaches that used region proposals was called R-CNN ( short for Regions with CNN features) by Ross Girshick et al.

They used an algorithm called Selective Search to detect 2000 region proposals and ran a CNN + SVM based image classifier on these 2000 bounding boxes.
The accuracy of R-CNN at that time was the state of the art, but the speed was still very slow ( 18-20 seconds per image on a GPU )
2.3 Fast R-CNN Object Detector
In R-CNN each bounding box was independently classified by the image classifier. There were 2000 region proposals and the image classifier calculated a feature map for each region proposal. This process was expensive.
In the followup work by Ross Girshick, he proposed a method called Fast R-CNN that significantly sped up object detection.
The idea was to calculate a single feature map for the entire image instead of 2000 feature maps for the 2000 region proposals. For each region proposal, a region of interest (RoI) pooling layer extracted a fixed-length feature vector from the feature map. Each feature vector was then used for two purposes:
- Classify the region into one of the classes ( e.g. dog, cat, background ).
- Improve the accuracy of the original bounding box using a bounding box regressor.

2.4 Faster R-CNN Object Detector
In Fast R-CNN, even though the computation for classifying 2000 region proposals was shared, the part of the algorithm generating the region proposals did not share any computation with the part that performed image classification.
In the follow up work called Faster R-CNN, the main insight was that the two parts — calculating region proposals and image classification — could use the same feature map and therefore share the computational load.
A Convolutional Neural Network was used to produce a feature map of the image which was simultaneously used for training a region proposal network and an image classifier. Because of this shared computation, there was a significant improvement in the speed of object detection.

3. Object Detection with PyTorch [ code ]
In this section, we will learn how to use Faster R-CNN object detector with PyTorch. We will use the pre-trained model included with torchvision. Details of all the pre-trained models in PyTorch can be found in torchvision.models
Sounds interesting? Do you want to learn more about all of these models and many more application and concepts of Deep Learning and Computer Vision in detail? Check out the official Deep Learning and Computer Vision courses offered by OpenCV.org.
3.1. Input and Output
The pretrained Faster R-CNN ResNet-50 model that we are going to use expects the input image tensor to be in the form [n, c, h, w] and have a min size of 800px, where:
- n is the number of images
- c is the number of channels , for RGB images its 3
- h is the height of the image
- w is the width of the image
The model will return
- Bounding boxes [x0, y0, x1, y1] all the predicted classes of shape (N,4) where N is the number of classes predicted by the model to be present in the image.
- Labels of all the predicted classes.
- Scores of each of the predicted label.
3.2. Pretrained Model
Download the pretrained model from torchvision with the following code:
import torchvision model = torchvision.models.detection.fasterrcnn_resnet50_fpn(pretrained=True) model.eval()
Line 2 will download a pretrained Resnet50 Faster R-CNN model with pretrained weights.
Define the class names given by PyTorch’s official docs
COCO_INSTANCE_CATEGORY_NAMES = ['__background__', 'person', 'bicycle', 'car', 'motorcycle', 'airplane', 'bus', 'train', 'truck', 'boat', 'traffic light', 'fire hydrant', 'N/A', 'stop sign', 'parking meter', 'bench', 'bird', 'cat', 'dog', 'horse', 'sheep', 'cow', 'elephant', 'bear', 'zebra', 'giraffe', 'N/A', 'backpack', 'umbrella', 'N/A', 'N/A', 'handbag', 'tie', 'suitcase', 'frisbee', 'skis', 'snowboard', 'sports ball', 'kite', 'baseball bat', 'baseball glove', 'skateboard', 'surfboard', 'tennis racket', 'bottle', 'N/A', 'wine glass', 'cup', 'fork', 'knife', 'spoon', 'bowl', 'banana', 'apple', 'sandwich', 'orange', 'broccoli', 'carrot', 'hot dog', 'pizza', 'donut', 'cake', 'chair', 'couch', 'potted plant', 'bed', 'N/A', 'dining table', 'N/A', 'N/A', 'toilet', 'N/A', 'tv', 'laptop', 'mouse', 'remote', 'keyboard', 'cell phone', 'microwave', 'oven', 'toaster', 'sink', 'refrigerator', 'N/A', 'book', 'clock', 'vase', 'scissors', 'teddy bear', 'hair drier', 'toothbrush']
We can see some N/A’s in the list, as a few classes were removed in the later papers. We will go with the list given by PyTorch.
3.3. Prediction of the model
Let’s define a function to get the image path and get the prediction of the image by the model.

def get_prediction(img_path, threshold):
  """
  get_prediction
    parameters:
      - img_path - path of the input image
      - threshold - threshold value for prediction score
    method:
      - Image is obtained from the image path
      - the image is converted to image tensor using PyTorch's Transforms
      - image is passed through the model to get the predictions
      - class, box coordinates are obtained, but only prediction score > threshold
        are chosen.

  """
  img = Image.open(img_path)
  transform = T.Compose([T.ToTensor()])
  img = transform(img)
  pred = model([img])
  pred_class = [COCO_INSTANCE_CATEGORY_NAMES[i] for i in list(pred[0]['labels'].numpy())]
  pred_boxes = [[(i[0], i[1]), (i[2], i[3])] for i in list(pred[0]['boxes'].detach().numpy())]
  pred_score = list(pred[0]['scores'].detach().numpy())
  pred_t = [pred_score.index(x) for x in pred_score if x>threshold][-1]
  pred_boxes = pred_boxes[:pred_t+1]
  pred_class = pred_class[:pred_t+1]
  return pred_boxes, pred_class
- Image is obtained from the image path
- The image is converted to image tensor using PyTorch’s Transforms
- The image is passed through the model to get the predictions
- Class, box coordinates are obtained, but only prediction score > threshold are chosen.
3.4. Pipeline for Object Detection
Next we will define a pipeline to get the image path and get the output image.
def object_detection_api(img_path, threshold=0.5, rect_th=3, text_size=3, text_th=3):
	boxes, pred_cls = get_prediction(img_path, threshold)
	# Get predictions
	img = cv2.imread(img_path)
	# Read image with cv2
	img = cv2.cvtColor(img, cv2.COLOR_BGR2RGB)
	# Convert to RGB
	for i in range(len(boxes)):
		cv2.rectangle(img, boxes[i][0], boxes[i][1],color=(0, 255, 0), thickness=rect_th)
		# Draw Rectangle with the coordinates
		cv2.putText(img,pred_cls[i], boxes[i][0], cv2.FONT_HERSHEY_SIMPLEX, text_size, (0,255,0),thickness=text_th)
		# Write the prediction class
		plt.figure(figsize=(20,30))
		# display the output image
		plt.imshow(img) plt.xticks([]) plt.yticks([]) plt.show()
- prediction is obtained from get_prediction method
- for each prediction, bounding box is drawn and text is written
with opencv - the final image is displayed
3.5. Inference
Now lets use the API pipleine which we built to detect object in some images. The pretrained Model takes around 8 seconds for inference in CPU and 0.15 second in NVIDIA GTX 1080 Ti GPU.
Example 3.5.1
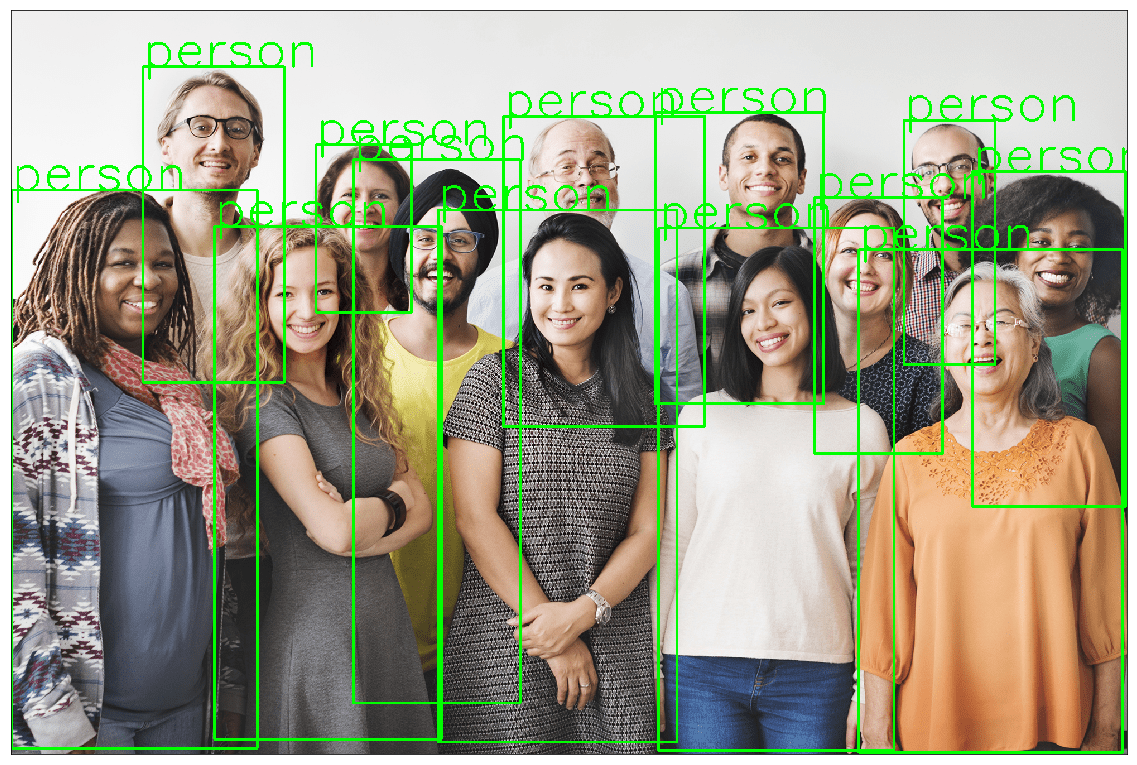
Download an image for inference
wget https://www.wsha.org/wp-content/uploads/banner-diverse-group-of-people-2.jpg -O people.jpg
use the image with the api function to display the output.
object_detection_api('./people.jpg', threshold=0.8)
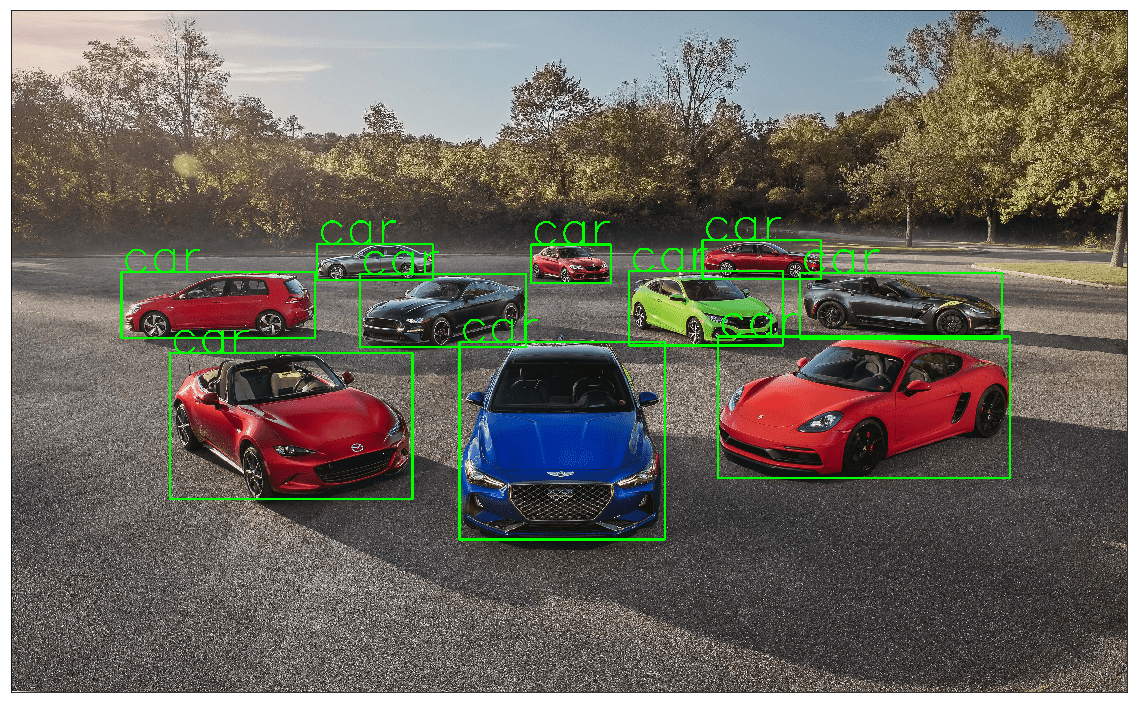
Example 3.5.2
Let’s try more examples
!wget https://hips.hearstapps.com/hmg-prod.s3.amazonaws.com/images/10best-cars-group-cropped-1542126037.jpg -O car.jpg object_detection_api('./car.jpg', rect_th=6, text_th=5, text_size=5)
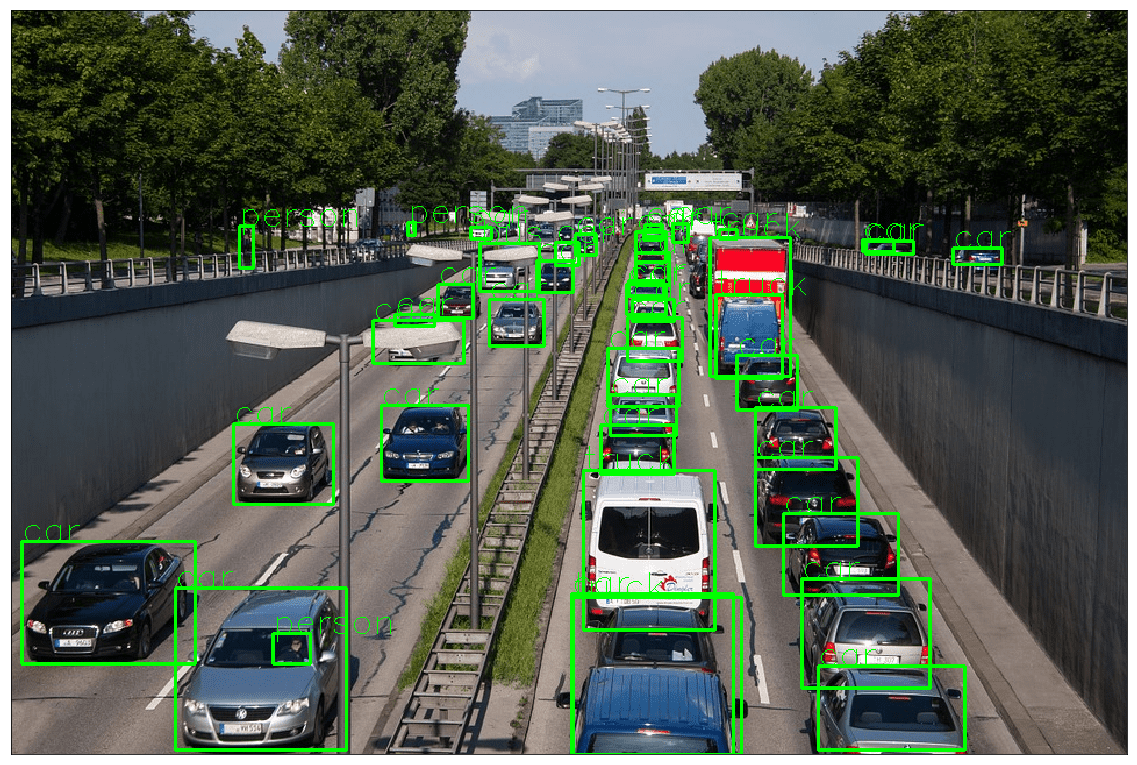
Example 3.5.3
!wget https://cdn.pixabay.com/photo/2013/07/05/01/08/traffic-143391_960_720.jpg -O traffic.jpg object_detection_api('./traffic.jpg', rect_th=2, text_th=1, text_size=1)
Example 3.5.4
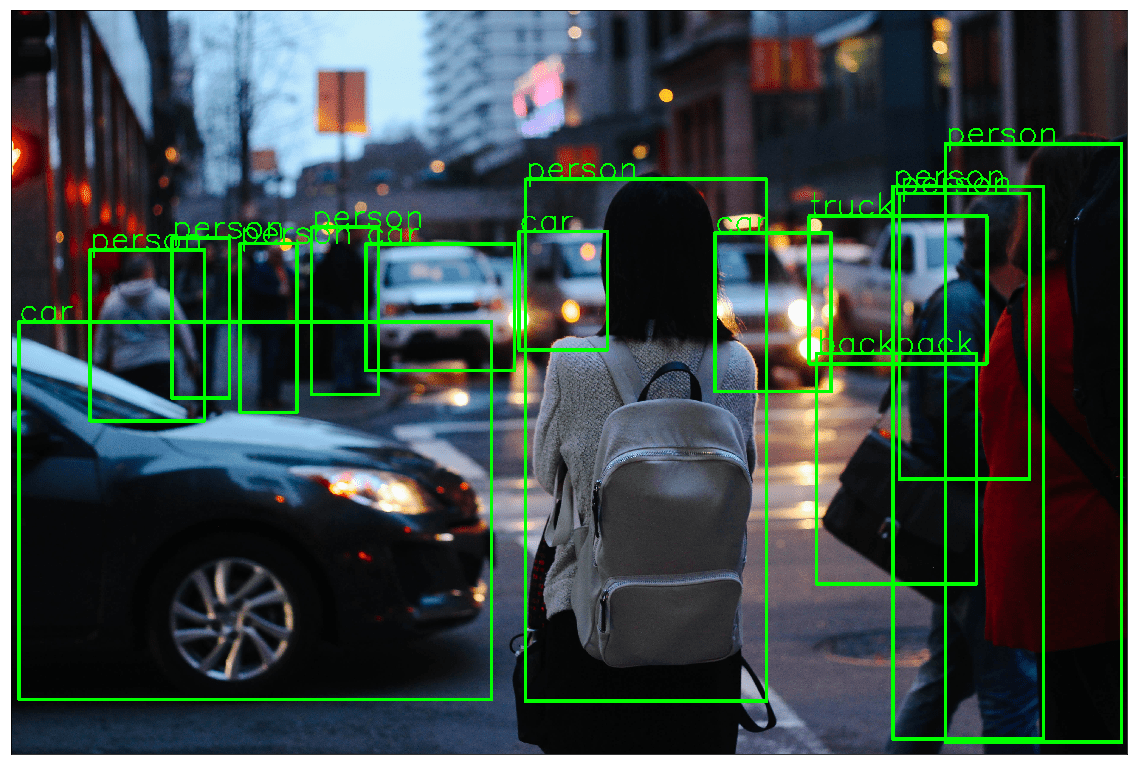
!wget https://images.unsplash.com/photo-1458169495136-854e4c39548a -O girl_cars.jpg object_detection_api('./girl_cars.jpg', rect_th=15, text_th=7, text_size=5, threshold=0.8)
4. Comparing the inference time of model in CPU & GPU
We would like to know the inference time of each of the models in CPU and GPU. We measure of the time taken by the model to predict the output for an input image. ie: time taken for prediction = model(image)
| Models | CPU | GPU |
|---|---|---|
| Faster R-CNN ResNet-50 FPN | 8.45859 s | 0.15356 s |

